
UA Piston Rack Installation
To install your own SHS Piston Rack into your UA 'Bert' Piston Body.
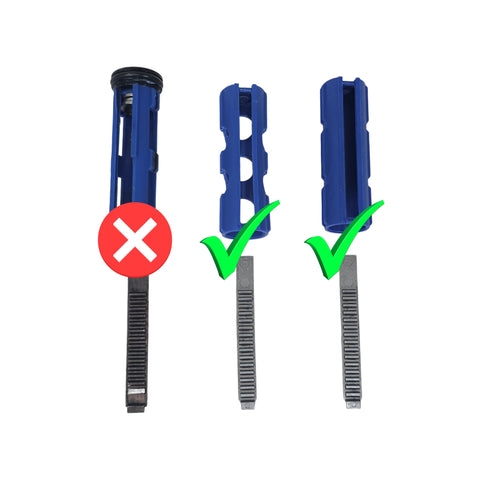
Make sure you have one of these racks, commonly found in SHS Full Body Pistons, and SHS Swiss Cheesed Pistons.
The UA Bert Piston IS NOT COMPATIBLE with the MIM Teeth found in the 'Rectangle Cut' SHS Pistons. As they feature a wider width body. We also recommend using the MIM Teeth from SHS for superior strength, as their CNC ones are weaker than MIM.
SHS Rack Compatible Dimensions as as shown.
Rack Thickness: ~1.08mm
Rack Length (Including Pickup Tooth): ~66.24mm
Rack Length (Not including Pickup Tooth): ~63.77mm
Rack Width: 8.05mm
Teeth Width: 5.99mm
Prepare the rack by degreasing and or removing any existing epoxy/glue material from the rack using some degreaser/solvent.
You need to cut 2 areas on an SHS MIM Rack. We need to thin out the rear tab up to the "Second Tooth" and be about over half way of the second tooth. Cutting too little may cause a sharp stress point on the inside of the rack reducing strength. Overcutting should not cause any premature damage. When measured from the front to the side notch you make it should be about 59.25mm-60.25mm as shown below. Having the notch measure larger than 60.25mm may have premature stress at a weak point. Thus its best to stay closer to 59.25mm.


The UA Pro Piston is designed to bear the brunt of the force at the front where the Rack notches into the Piston. The rear area is intended to hold up from bending and deforming when the pickup tooth is engaged under high speed. Both areas work in tandem with eachother to support the rack itself.
Though this piston is incredibly strong for its weight class and tolerant to user error, this may lead to other failures inside a gearbox should a user choose to ignore the common sounds of "PME". Other damage may include, stripped gears, damaged bearings, even motor pinion failure. Thus if testing for the first time its common tech knowledge to fire in semi first, do a short burst in full auto. Then follow up with longer full auto fire. The next step is to shoot with light bb weights such as 0.20g then test for heavy weights. As extremely heavy BBs may cause PME when lighter ones do not. This advice is generally aimed at those achieving extremely fast RPS of +50 and guarantee to generally happen above 60RPS.
After notching the piston rack, removing the second teeth, and cutting the third tooth in half. For additional weight savings you could grind off the extra teeth if you intend to short stroke or utilize a DSG.
However as a useful indicator it does help to keep 1 extra teeth on your piston to confirm whether or not PME did happen. As if there is wear on that extra piston tooth you can confirm PME did in fact happen.
Once the rack is prepared as you want it. ensure you super glue or Epoxy the rack in place in the Piston Body. Ensure to wipe any excess away.
We use Rubber reinforced super glue as it does have a higher impact rating than standard Cyanoacrylate super glues.
Ensure to insert the rack all the way so that the top area of the rack is flush with the top of the body.

On slower builds, AoE can be adjusted as normal and generally a good habit to do. However on some advanced builds, under AoEing is preferred for both weight savings, as well as pushing as much FPS possible, as well as help prevent PME from "piston bounce".
With Piston heads, they normally come with 2 thrust bushings, and 1 thrust bearing. If weight savings is required, you may do with just 1 thrust bushing to protect the plastic body from the metal spring itself. However its generally a better idea to keep all 3 parts as it also reinforces the front lip of the piston. As well as allow the spring to coil and uncoil as necessary to prevent the spring from snapping.
We strongly recommend installing the Piston head very tight, and use red threadlock to prevent the piston from falling out.